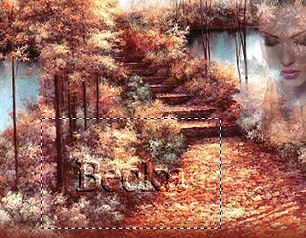
 Notes: If any filters are used, please note that if you don't already have them installed that you will have to close PSP, Install, then start PSP again. Advanced Supplies: Scenery Autumn
002_07-06_002_girl Male Cowboy Eye Candy 3 Own tube/Graphic/Image: Make sure your tube is: Scenery: 500 x 375
Cowboy: 170 x 320 Girl: 170 x 240 Preparation: Take the Scenery Step 1: Edit/Copy the woman
Edit/Copy
Edit/Paste as a New Image Step 2: Back to your main image
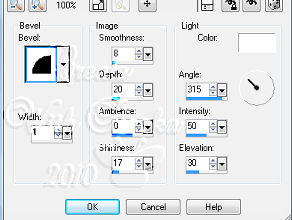
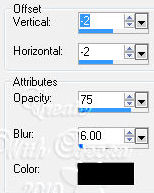
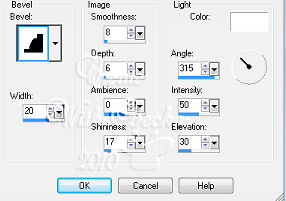
Selections/Select All Effects/3D Effects/Inner Bevel
Selections/Select None
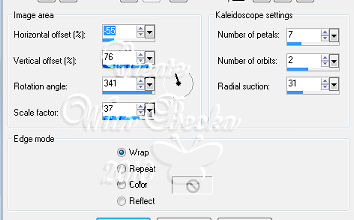
Image/Add Borders/White/20 px Highlight your border Edit/Copy your selection Edit/Paste Into Selection Adjust/Sharpness/Sharpen Effects/Reflection Effects/Kaleidoscope
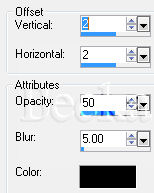
Effects/3D Effects/Drop Shadow
Effects/Plugins/Eye Candy 3.0/Swirl
Whirlpool: 30 Smear Length: 15 Twist: 70 Streak: 40 Wrap/Smooth: Checked Effects/3D Effects/Inner Bevel
Step 3: Image/Add Borders/1px/Black
Selections/Select All Selections/Modify/Contract/23 px Selections/Invert Edit/Copy Selections/Select None Image/Add Borders/23 px/White Highlight this border Edit/Paste Into Selection Selections/Select None Image/Add Borders/1px/Black
Step 4: Take the cowboy
Step 5: Add a Caption - all settings your choice
Add your Name Layers/New Raster Layer Add your watermark Resize to 450 on the longest side Adjust/Sharpness/Sharpen Layers/Merge/Merge Visible
Voila!! ©CreateWithBecka 3-21-10 |
|


Make a Free Website with Yola.