Notes:
This tut was done in PSP 10 but should work as well in other versions.
Some knowledge of, and experience with, PSP is required.
A trial version of PSP can be downloaded from here.
You are welcome to use my images, or use your own
If any filters are used, please note that if you don't already have them installed that you will have to close PSP, Install, then start PSP again.
Intermediate
Supplies:
Preg_women
Simple
Preparation:
Open the Tube, Duplicate and close the original
Open a transparent 300 x 300 image, minimize
Open another transparent image 200x200
Pick 2 solid colors and place them in your Materials Palette
Step 1:
We are going to start with the 200 x 200 image
Selections/Select All
Take your tube and Edit/Copy
Edit/Paste Into Selection
Selections/Selections None
Effects/Plugins/Simple/Quick Tile/Default
Adjust/Blur/Gaussian Blur/30
Layers/New Raster Layer
Flood fill with your dark color
Lower the opacity of this layer to 65
Layers/Merge/Merge Visible
Go to your materials palette and click the foreground box, then 'Pattern' then the image that you just created.
Angle: 90
Scale: 30
Minimize your 200 x 200 image
Step 2:
Open your 300 x 300 transparent image, we will now be working on this.
Flood fill your pattern onto your 300 x 300 image
Layers/Duplicate
On your Copy of Raster 1 layer, highlight
Image/Mirror
Lower the opacity to 60
Maximize your tube and Edit/Copy
Paste your tube as a new layer onto your image.
Move the tube to the left
Step 3:
Using your light color, type something that comes to mind I chose 'The Beauty Of Pregnancy'
Font: Black Chancery
Size: 36Font Style: BoldAlignment: CenterAnti-Alias: SharpStroke Width: 1.0Create As: VectorSettings may vary depending on the font that you are using
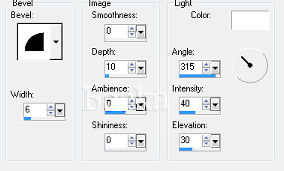
Effects/3D Effects/Inner Bevel
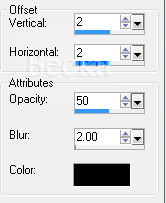
Effects/3D Effects/Drop Shadow
Make a gradient out of your 2 colors
Foreground/Background
Angle: 45
Repeats: 10
Linear
Step 4
Image/Add Borders/1 px/Black
Image/Add Borders/10 px/White
Highlight this border
Flood Fill with your gradient
Effects/3D Effects/Outer Bevel

Repeat EXCEPT change the Angle to 144
Effects/3D Effects/Inner Bevel

Deselect
Image/Add Borders/1 px/Black
Layers/New Raster Layer
Add your watermark
Add Name – Settings, font your choice
Repeat Drop Shadow
Layers/Merge/Merge Visible
Voila!!
©CreateWithBecka
2009-2011