Notes:
This tut was done in PSP 10 but should work as well in other versions.
Some knowledge of, and experience with, PSP is required.
A trial version of PSP can be downloaded from here.
You are welcome to use my images, or use your own
If any filters are used, please note that if you don't already have them installed that you will have to close PSP, Install, then start PSP again.
Advanced
Supplies:
YetAnotherSunset
Graca_Macedo_BR_003423
Andrews 8
Animation
Heartline3TBC - Preset
Preparation:
Make sure that the heartline preset is in your preset folder - you will have to place it in there and then re-start PSP, for it to show.
Open the Sunset Tube
Duplicate
Close the original
Make sure that you have the plugin installed
Open the Graca_Macedo Tube
Duplicate 3x
Leave 1 the original size (Rename Seamless)
Resize one to 90% (Rename Twirled)
(390 x 570)
Resize the other to 45% (Rename Main)
(195 x 284)
Close the original
Pick 2 colors from your Graca Tube; a light and dark color
Make a gradient with these 2 colors

Step 1:
Take your Twirled image
Add New Raster Layer
Flood Fill with your darker color
Layers/Arrange/Send To Bottom
Layers/Merge/Merge Visible
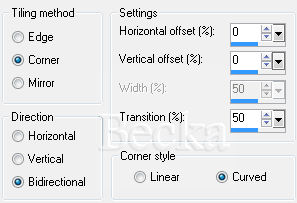
Effects/Image Effects/Seamless Tiling
Adjust/Blur/Radial Blur
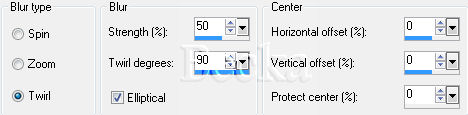
Effect/Distortion/Twirl/360 degrees
Effects/Plugins/Andrews8/White Noise
Random 1: 0
Random 2: 50
Minimize
Step 2:
Maximize your sunset tube
Image/Add Borders/1px/Black
Image/Add Borders/10px/White
Highlight this border
Using your gradient
Flood Fill your border with your gradient
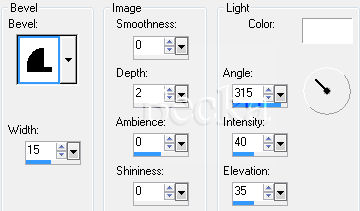
Effects/3D Effects/Inner Bevel
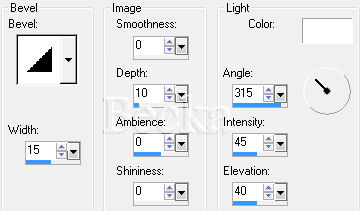
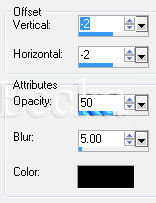
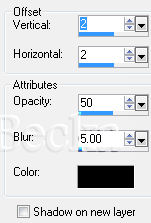
Effects/3D Effects/Drop Shadow

Selections None
Image/Add Borders/20px/White
Highlight this border
Step 3:
Take your 'Twirled' image
Edit/Copy
Edit/Paste Into Selection
While still selected add an Inner Bevel:
Effects/3D Effects/Drop Shadow

Selections/Select None
Image/Add Borders/Black/1px
Image/Add Borders/White/30px
Highlight this border
Step 4:
Take your Seamless image
Layers/New Raster Layer
Flood fill with black
Layers/Arrange/Send to Bottom
Layers/Merge/Merge Visible
Effects/Image Effects/Seamless Tiling/Default
Go to your materials Palette click on the Pattern Tab/chose the image that we just made
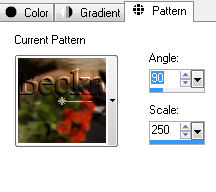
Flood fill your pattern into your border
Effects/3D Effects/Inner Bevel/Same as before
Effects/3D Effects/Drop Shadow/Same 2 as before
Selections/Select All
Edit/Copy
Selections/Select None
Image/Add Borders/White/60px
Highlight this border
Edit/Paste Into Selection
Selections/Select None
Resize your image by 50%
Layers/New Raster Layer
Apply your watermark :-)
Step 5:
Take your main Graca image
Edit/Copy
Edit/Paste as a New Layer onto your background
Move down slightly
Take your Heart Preset (click on the preset shape tool in the toolbar)
In your new image draw out a heart, your desired size
Put this heart around the couple
Layers/New Raster
Add a Caption
Layers/New Raster Layer
Add your Name
Highlight the heart
Use the twirled image
Delete the Vector heart layer
Edit/Copy
Edit/Paste Into Selection
Highlight the Main image (couple layer)
Layers/Arrange/Bring to top
Duplicate your heart layer
Highlight one of the hearts
Adjust/Add-Remove Noise/Add Noise
Gaussian
Noise: 40
Monochrome: Checked
Highlight the other heart
Adjust/Add-Remove Noise
Gaussian
Noise: 45
Monochrome: Checked
Close off the 2 heart layers
Layers/Merge/Merge Visible
Selections/Select None
Open the 2 heart layers
Step 6
Open Animation
In PSP, close off the top heart layer
Highlight the other heart layer
Edit/Copy Merged
In Animation
Edit/Copy as a New Animation
Back to PSP
Open the Top Layer
Close off the middle layer
Highlight the top layer
Edit/Copy Merged
In Animation
Edit/Copy After Selected Frame
Right click/View Animation
Animation/Resize Animation to: 69%
(275 x 344)
©CreateWithBecka
2009-2011
3-7-10