 Notes: Beginner Supplies: Pigletshoneypot Simple Preparation: Take your tube, duplicate, close the original Pick 2 colors from your tube Step 1: Take your tube
Layer/New Raster Layer
Flood Fill with your light color Layers/Arrange/Send to bottom Step 2: Add a Caption
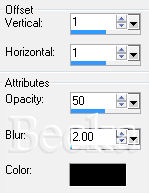
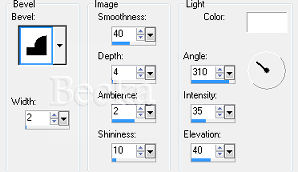
Effects/3D Effects/Drop Shadow - same as above Effects Effects/3D Effects/Inner Bevel - if desired -- use your settings if used Layers/Merge/Merge Visible Step 3: Image/Add Borders/1 px/black
Selections/Select None Step 4: Image/Add Borders/1 px/black
Layers/New Raster Layer Add watermark Add your name Add same Inner Bevel and Drop Shadow as before Layers/Merge/Merge Visible
Voila!! ©CreateWithBecka
|
|


Make a Free Website with Yola.