 Notes: Intermediate Supplies: CGS~RM_White pup and children 2 205 Preparation: Open a 400 x 400 Transparent Image Pick 2 colors from your image Make sure that you have you mask in the mask folder
Step 1: 400 x 400 image
Flood fill with your dark color Layers/New Raster Layer Flood fill with your light color Edit/Copy your tube Edit/Paste as a New Layer Resize to 270 x 270 Step 2: Highlight your Raster 2 layer
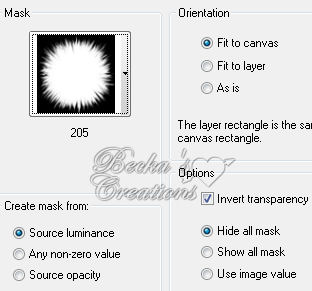
Layers/Load-Save Mask/Load Mask From Disk/205
Layers/Merge/Merge Group
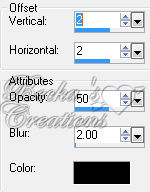
Effects/3D Effects/Drop Shadow
Highlight your tube layer
Apply this same Drop Shadow Layers/Merge/Merge Visible Step 3: Image/Add Borders/1 px/Black
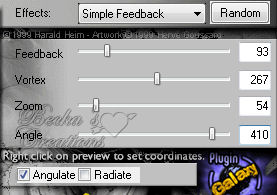
Layers/Promote background layer Edit/Copy Image/Add Borders/20 px/White Highlight this border Effects/Plugins/Plugin Galaxy/Feedback
 Effects/3D Effects/Drop Shadow/Same as before
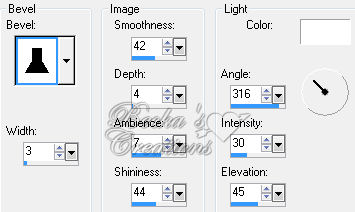
Effects/3D Effects/Inner Bevel
Repeat Inner Bevel
Selections/Select None Image/Add Borders/1 px/Black Step 4: Layers/New Raster Layer
Add Watermark Add Name Add Caption Effects/3D Effects/Drop Shadow
Layers/Merge/Merge Visible
Image/Re-size to 350 on the longest side ©CreateWithBecka 6-16-09
|
|


Make a Free Website with Yola.