 Notes:
This tut was done in PSP 10 but should work as well in other versions. Advanced Supplies: 3 Preparation: Take your Graphic Step 1: Working with Graphic 1
Image/Add Borders/1 px/Black Image/Add Borders/5 px/White Go to your Graphic 2 and Edit/Copy Back to your Graphic 1 image, Edit/Paste INTO Selection Effects/3d Effects/Drop Shadow 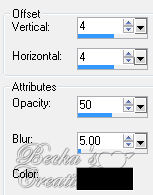 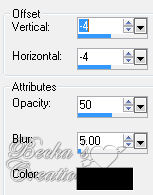 Highlight your Raster 1 layer Layers/Arrange/Send to Bottom Effects/3d Effects/Inner Bevel 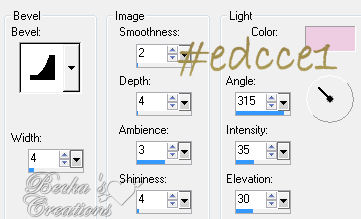 Selections/Select None Layers/Merge/Merge Visible Step 2: Image/Add Borders 1 px Black
Image/Add Borders 15 px White Go to your Graphic 2 image and Edit/Copy Highlight your border Back to your Graphic 1 image, Edit/Paste INTO Selection Image/Mirror Deselect Step 3: Image/Add Borders 1 px black
Image/Add Borders 15 px #f9c2bd Highlight this border Effects/Artistic/Balls and Bubbles 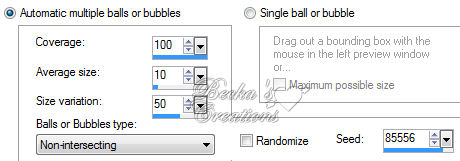    Repeat Deselect Step: 4 Image/Add Borders 1 px Black
Image/Add Borders 20 px White Go to your Graphic 2 image and using the selection tool, make a selection around some of the flowers Edit/Copy Back to Graphic 1 image, Edit/Paste INTO Selection Adjust/Sharpness/Sharpen Effects/3d Effects/Drop Shadow -- both Drop Shadows as before Highlight your Raster 1 layer Layers/Arrange/Send to bottom Effects/3d Effects/Inner Bevel/same as before Selections/Select None Step 5: Layers/New Raster Layer
Add your Watermark Add a caption -- your choice of font, size, settings Add your name -- your choice of font, size, settings Layers/Merge/Merge Visible Re-size to 400
Voila!! ®©Create With Becka 10-25-09   |
|

Make a Free Website with Yola.