Notes:
This tut was done in PSP 10 but should work as well in other versions.
Some knowledge of, and experience with, PSP is required.
A trial version of PSP can be downloaded from here.
You are welcome to use my images, or use your own
If any filters are used, please note that if you don't already have them installed that you will have to close PSP, Install, then start PSP again.
Advanced
Supplies:
Fantasy (14)
Pinwheel Violet or Bronze -- Preset Picture Tube
Simple
Preparation:
Open a transparent image 600 x 600
Open a transparent image 200 x 200
Minimize both
Take your tube
Image/Resize to 50%
(400 x 300)
Duplicate
Close the original
Pick 2 colors from your tube (#040040 & #0aa584)
Step 1:
Take your Fairy image
Layers/New Raster Layer
Layers/Arrange/Send To Bottom
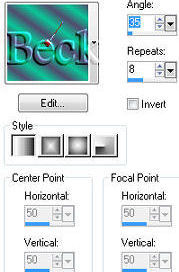
Using the 2 colors that you chose, make a gradient with these settings

Flood fill
Layers/New Raster Layer
Lower the opacity of this layer is 70
Highlight your tube layer
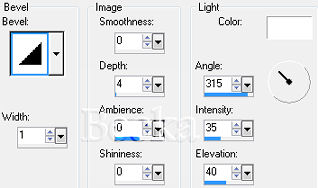
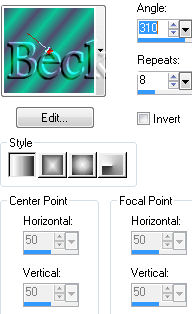
Effects/3D Effects/Inner Bevel
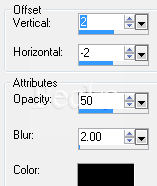
Effects/3D Effects/Drop Shadow
Step 2:
Go to your Layers palette and Highlight your raster 3 layer
Layers/Merge/Merge Down
Edit/Copy
Image/Add Borders/1 px/Black
Image/Add Borders/10 px/White
Highlight this border
Edit/Paste into selection
Go to your layers Palette, right click, Promote to Background Layer
Effects/3D Effects/Drop Shadow
Image/Add Borders/1 px/Black
Step 3:
Maximize your 600 x 600 transparent image
Flood Fill with your gradient

Layers/New Raster layer
Flood Fill with your other gradient

Lower the opacity of 1 layer to 46
Effects/3D Effects/Inner Bevel/same as before
Layers/Merge/Merge Visible
Take your image with the fairy
Edit/Copy
Edit/Paste as a new layer onto your 600 x 600 image
Highlight your tube layer, right click and duplicate
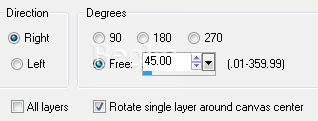
Image/Free Rotate
Layers/Arrange/Move Down
On the 2 fairy layers
Add this Drop Shadow

Step 4:
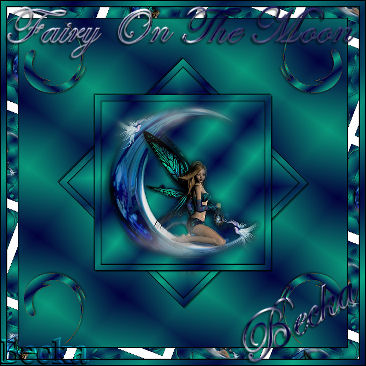
This is what you should have now
Maximize your 200 x 200 transparent image
Go to your picture tubes
Chose Pinwheel Violet
Selections/All
Selections/Selections Float
Selections/De-Float
Use your Gradient and Color your pinwheel
Either of the 2 settings for the gradient will work
Selections/Select None
Take your pinwheel
Copy/Paste as a new Layer onto your 600 x 600 image
Image/Free Rotate/Right/180 - or as desired
Place this into the top left corner
Effects/3D Effects/Drop Shadow

Effects/Plugins/Simple/Top Left Mirror
Step 5:
Image/Add Borders/1 px/Black
Image/Add Borders/20 px/White
Click on the pattern tab in your materials palette
Find your image
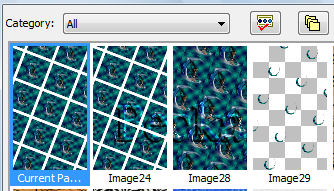
Use these settings
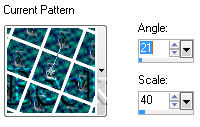
Highlight your border
Flood fill with your pattern
Effects/3D Effects/Drop Shadow


Selections/Select None
Image/Add Borders 1 px Black
Step 6:
Image/Add Borders/10 px/White
If you keep getting more than the border
Selections/Select All
Selections/Modify/10 px
Selections/Invert
Flood fill with this gradient
Layers/New Raster Layer

Lower the opacity of this layer to 70
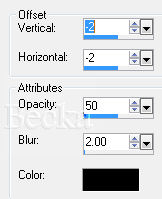
Effects/3D Effects/Drop Shadow


Selections/Select None
Image/Add Borders 1 px Black
Image/Re-size to 55%
Step 7:
Add your Name
Add a Caption
Layers/New Raster Layer
Add Watermark
Layers/Merge/Merge Visible
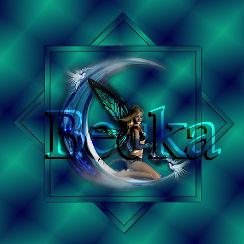
All Done
®©Create With Becka
2009-2011
12-19-09