 Notes:
This tut was done in PSP 10 but should work as well in other versions. Some knowledge of, and experience with, PSP is required. A trial version of PSP can be downloaded from here. You are welcome to use my images, or use your own If any filters are used, please note that if you don't already have them installed that you will have to close PSP, Install, then start PSP again. Advanced Supplies:
[WallpapersMania_vol98-023_1_1
CJ_Accents.12
Babyleopard
Filters Unlimited Simple
Animation Shop
Preparation: Take your background Edit/Copy Edit/Paste as a new Image
Image/Resize to: 25%
(400 x 300)
Minimize
Take your Accent and pick one that you like
Edit/Copy
Edit/Paste as a new Image
Image/Resize to 20%
(71 x 73)
Minimize
Edit/Paste as a new Image
Image/Resize to 50%
(194 x 173) Step 1:
Go to your background
Selections/Select All
Selections/Modify/Contract/15 px
Selections/Invert
Effects/3D Effects/Inner Bevel 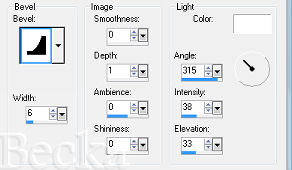 Effects/3D Effects/Drop Shadow 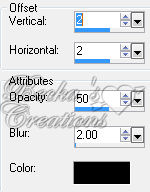  Edit/Copy
Edit/Paste as a new Image - This is your frame
Minimize
Selections/Select None
Step 2: Image/Add Borders/1px/Black
Image Add Borders/20 px/White
Selections/All
Selections/Modify/Contract/20 px
Selections/Invert
Effects/Reflection Effects/Kaleidoscope 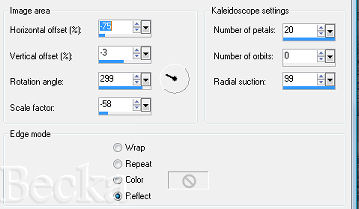 Effects/Plugins/Filters Unlimited/Tile & Mirror/Kaleidoscope 2/Default
Add the 2 Drop Shadows from before
Selections/Select None Step 3:
Image/Add Borders/1 px/Black
Image/Add Borders/20 px/White
Selections/All
Selections/Modify/Contract/20 px
Selections/Invert Take your frame - maximize
Edit/Copy
Edit/Paste Into Selection
Add the 2 Drop Shadows again
Selections/Select None
Close the Frame Step 4:
Image/Add Borders/1 px
Take your Accent
Edit/Copy
Edit/Paste as a new Layer
Place it in the upper left corner
Effects/Simple/Top Left Mirror
Effects/3D Effects/Drop Shadow  Close the accent
Step 5:
Layers/New Raster Layer
Add Watermark
Add your Name
Place how and where you like it
Effects/3D Effects/Drop Shadow  Add a caption  Place it between the accents
Effects/3D Effects/Drop Shadow Layers/Merge/Visible
Edit/Copy
Open Animation
Edit/Paste As A New Animation
Edit/Copy
Edit/Paste After Current Frame
Step 6:
Working with the leopard
Effects/3D Effects/Drop Shadow  Layers/Duplicate
Make a selection around the area that you would like to see 'moving' using your Freehand Tool
Highlight one of the layers
Effects/Distortion/Punch/25 -- Adjust according to the size of the image to which you are using.
Selections/Select None
Edit/Copy the top layer
Edit/Paste As A New Animation
Back in PSP
Edit/Copy your bottom layer
Edit/Paste After the Current Frame
This is what you should have: 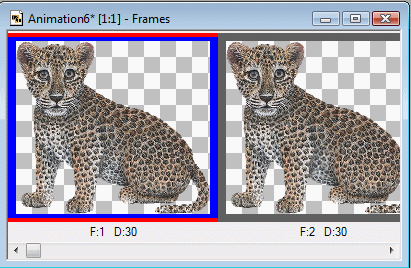 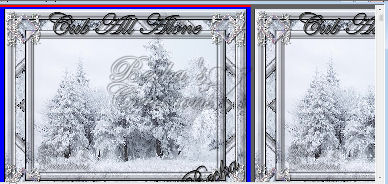 Step 7:
Take the leopard image
Edit/Select All
Edit/Copy
Go to your Background
Edit/Select All
Edit/Paste into Selected Frame - Leopard into the background
You will see that it will go into all frames
Animation/View Animation
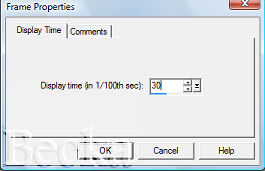
If the breathing is too fast, Right click on the image/Frame Properties
 Check your animation, is it the way you like it?
If so, continue.
If not, change the speed until it is
Animation/Re=size Animation/350 on the longest side
Check animation 1 more time, if all looks good... Save
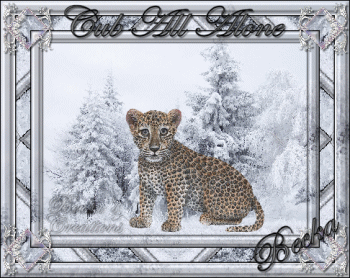
VOILA! ®©Create With Becka 2009-2011   |
|

Make a Free Website with Yola.