Notes:
This tut was done in PSP 10 but should work in other versions.
Some knowledge of, and experience with, PSP is required.
You are welcome to use my images, or use your own
If any filters are used, please note that if you don't already have them installed that you will have to close PSP, Install, then start PSP again.
Intermediate
Supplies:
_BB-Betty-Bunnies
Andrews 46
Dragonfly
Filters Unlimited
Preparation:
Edit/Copy
Edit/Paste as a new Image 2x
Minimize 1 of the images
Pick 2 colors from your girl image (I chose #e175ff and #ff5a84)
Step 1:
Girl image
Layers/New Raster Layer
Flood fill with your light color
Layers/Arrange/Send to Bottom
Layers/Merge/Merge Visible
Effects/Image Effects/Seamless Tiling/Default
Effects/Plugins/Filters Unlimited/Distortion Filters/Twister/64
Effects/Image Effects/Seamless Tiling/Default
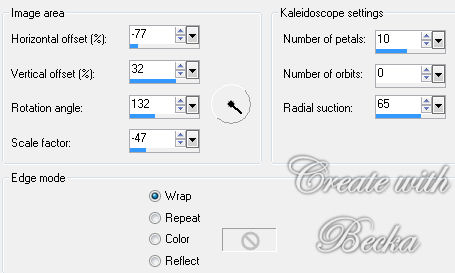
Effects/Reflection Effects/Kaleidoscope
Layers/New Raster Layer
Flood fill with White
Lower the opacity to 40 or what looks good to you
Effects/Plugins/Andrews 46/Kind of Mixed Up Show.../Default
Edit/Copy
Layers/Merge/Merge Visible
Step 2:
Take the other Betty Boop image
Edit/Copy
Edit/Paste as a new layer onto your background
Image/Re-size to 250 on the longest side - or what looks good to you
Step 3:
Image/Add Borders/1 px/Black
Image/Add Borders/35 px/White
Highlight with your magic wand
Edit/Paste Into Selection
Effects/Plugins/Dragonfly/Sinedots/Default
Selections/Invert
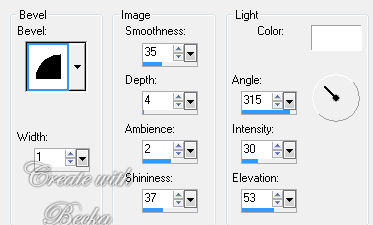
Effects/3D Effects/Outer Bevel
Selections/Select None
Image/Add Borders/1 px/Black
Step 4:
Layers/New Raster Layer
Add Name
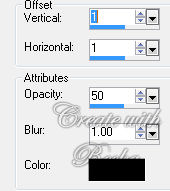
Effects/3D Effects/Drop Shadow

Layers/New Raster Layer
Add Watermark
Layers/New Raster Layer -- Optional
Add a Caption -- Optional
Effects/3D Effects/Drop Shadow -- Optional - Same as above
Layers/Merge/Merge Visible
Re-Size to 500 on the longest side - if needed
®©Create With Becka
12-12-10


