Notes:
This tut was done in PSP 10 but should work as well in other versions.
Some knowledge of, and experience with, PSP is required.
You are welcome to use my images, or use your own
If any filters are used, please note that if you don't already have them installed that you will have to close PSP, Install, then start PSP again.
Supplies:
Tag that you have made
RT0019_Beauty - Tube that I am using for this tutorial.
Tile Wave Mask
Preparation:
Edit/Copy your images - If following the tut from the beginning
Edit/Paste as new Images - If following the tag from the beginning
Pick 2 colors from your image (I chose #e2dcd4 and #82776a)
Pick 2 more colors that are different to be used for the text (I chose Black and White)
Animation
Step 1:
Layers/New Raster Layer
Close the 'image' layer
Flood fill with you darker color
Layers/New Raster Layer
Flood fill with your light color
Layers/Load~Save mask/Load Mask from Disk

Step 2:
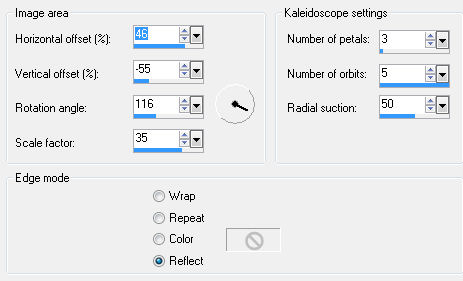
Effects/Reflection Effects/Kaleidoscope
Step 3:
Effects/Illumination Effects/Sunburst
Effects/3D Effects/Buttonize
Highlight the Group Layer
Effects/3D Effects/Buttonize
Step 4:
Open the Tube layer - Main image layer
(Should be the top layer, if not Layers/Arrange/Bring To Top)
Image/Re-Size to 700 (or what looks good to you)
Move to the corner opposite the corner


Effects/3D Effects/Drop Shadow

Layers/Merge/Visible
Step 5
Take your image and duplicate
Each font is different, and the size may differ from mine for that reason, you will need to adjust that setting to fit your needs.
Layers/New Vector Layer
Take 2 colors that you are wanting to use for the name of other text (I chose Black and White)
Type your name or whatever that you would like to be used for tagging
Make sure that you have the top layer highlighted
Effects/3D Effects/Drop Shadow
Step 7:
At this point you should have this... If not just move the layers around until you do...
Step 8:
Take the 2nd layer and the 4th layer and close them
Layers/Merge/Merge Visible
Open the other 2 layers and close the top one
Layers/Merge/Merge Visible
All layers
Step 9:
Highlite the first Layer
Open Animation
Edit/Paste As A New Animation
Go back to PSP
Go to the next layer
Edit/Copy
Back to Animation
Edit/Paste/Paste After Current Frame
Animation/Animation Re-Size - Re-Size to 500 on the longest side
Edit/Select All
Animation/Animation Properties - I put mine to 50, but the speed is up to you
®©CreateWithBecka
6-26-12


